 LoveCTO
创建es用户组及用户,创建安装目录
切换到root用户,执行如下命令:
#添加es用户组
groupadd es
#添加es用户到es用户组
useradd es -g es
设置es用户的密码
passwd es
切换到es用户
su es
进入es家目录
cd /home/es
下载安装包
到下面的链接查看最新的安装包,本次下载的版本是6.4.2
https://www.elastic.co/cn/downloads/elasticsearch
打开上面的链接,浏览器”F12″查看,获取到包的地址如下:
https://artifacts.elastic.co/downloads/elasticsearch/elasticsearch-6.4.2.tar.gz
在“/home/es”下执行如下命令把安装包下载到服务器:
wget https://artifacts.elastic.co/downloads/elasticsearch/elasticsearch-6.4.2.tar.gz
es安装运行
解压下载的安装包:
tar -zxvf elasticsearch-6.4.2.tar.gz
启动es
cd elasticsearch-6.4.2/bin/
./elasticsearch -d
启动过程中如果出现日下错误:
Java HotSpot(TM) 64-Bit Server VM warning: INFO: os::commit_memory(0x00000000c5330000, 986513408, 0) failed; error='Cannot allocate memory' (errno=12)
#
# There is insufficient memory for the Java Runtime Environment to continue.
# Native memory allocation (mmap) failed to map 986513408 bytes for committing reserved memory.
# An error report file with more information is saved as:
# logs/hs_err_pid577.log
这是因为es默认内存大小是1G,但是可以修改:
vi /home/es/elasticsearch-6.4.2/config/jvm.options
把“Xms1g和Xmx1g”中的“1g”改为512m”,修改后如下:
-Xms512m
-Xmx512m
再启动后查看进程:
ps -ef | grep elasticsearch
输入如下命令:
curl http://127.0.0.1:9200/
出现下面结果:
{
  "name" : "pUHC2rj",
  "cluster_name" : "elasticsearch",
  "cluster_uuid" : "WvaH45svQyiujIYr3MU-hQ",
  "version" : {
    "number" : "6.4.2",
    "build_flavor" : "default",
    "build_type" : "tar",
    "build_hash" : "04711c2",
    "build_date" : "2018-09-26T13:34:09.098244Z",
    "build_snapshot" : false,
    "lucene_version" : "7.4.0",
    "minimum_wire_compatibility_version" : "5.6.0",
    "minimum_index_compatibility_version" : "5.0.0"
  },
  "tagline" : "You Know, for Search"
}
关闭elasticsearch:
kill 进程ID
安装中文分词插件(elasticsearch-analysis-ik)
github地址:
https://github.com/medcl/elasticsearch-analysis-ik/releases
由于我们安装的es版本是6.4.2,所以我们这里下载插件也下载6.4.2(版本需保持一致)。
把下载的“elasticsearch-analysis-ik-6.4.2.zip”上传到es的安装目录的plugins目录下“/home/es/elasticsearch-6.4.2/plugins”,解压“elasticsearch-analysis-ik-6.4.2.zip”到“/home/es/elasticsearch-6.4.2/plugins/elasticsearch-analysis-ik-6.4.2”目录后,删除刚刚上传的zip文件。
杀掉elasticsearch进程重启elasticsearch,前台运行时出现“loaded plugin [analysis-ik]”,说明ik插件加载成功。
elasticsearch-head插件安装
安装nodejs
yum install -y nodejs
安装grunt
npm install -g grunt
查看版本:
node -v
npm -v
grunt -version
在”/home/es”下创建“elasticsearch-head”目录,进入到创建的目录执行:
wget https://github.com/mobz/elasticsearch-head/archive/master.zip
解压zip包
unzip master.zip
进入到解压文目录“elasticsearch-head-master”,执行命令:
npm install
如果安装失败,尝试使用国内镜像安装
npm install -g cnpm --registry=https://registry.npm.taobao.org
修改Head插件配置文件
vi Gruntfile.js
到connect:server,添加hostname一项,如下
connect: {
    server: {
        options: {
            hostname: '0.0.0.0',
            port: 9100,
            base: '.',
            keepalive: true
        }
    }
}
修改es配置文件elasticsearch.yml,把“network.host”的地方前面注释掉并修改为:
network.host: 0.0.0.0
再在elasticsearch.yml后面添加如下的内容:
http.cors.enabled: true
http.cors.allow-origin: "*"
重启elasticsearch出现如下错误:
ERROR: [2] bootstrap checks failed
[1]: max file descriptors [65535] for elasticsearch process is too low, increase to at least [65536]
[2]: max virtual memory areas vm.max_map_count [65530] is too low, increase to at least [262144]
修改/etc/sysctl.conf配置文件,添加vm.max_map_count=262144,记得需要重启机器才起作用。
重启elasticsearch出现如下错误:
ERROR: [1] bootstrap checks failed
[1]: max file descriptors [65535] for elasticsearch process is too low, increase to at least [65536]
maxfile descriptors为最大文件描述符,设置其大于65536即可。解决方法是修改/etc/security/limits.conf文件,添加:
* - nofile 65536
* - memlock unlimited
“*”表示给所有用户起作用。
在head插件目录下执行如下命令启动head:
npm run start
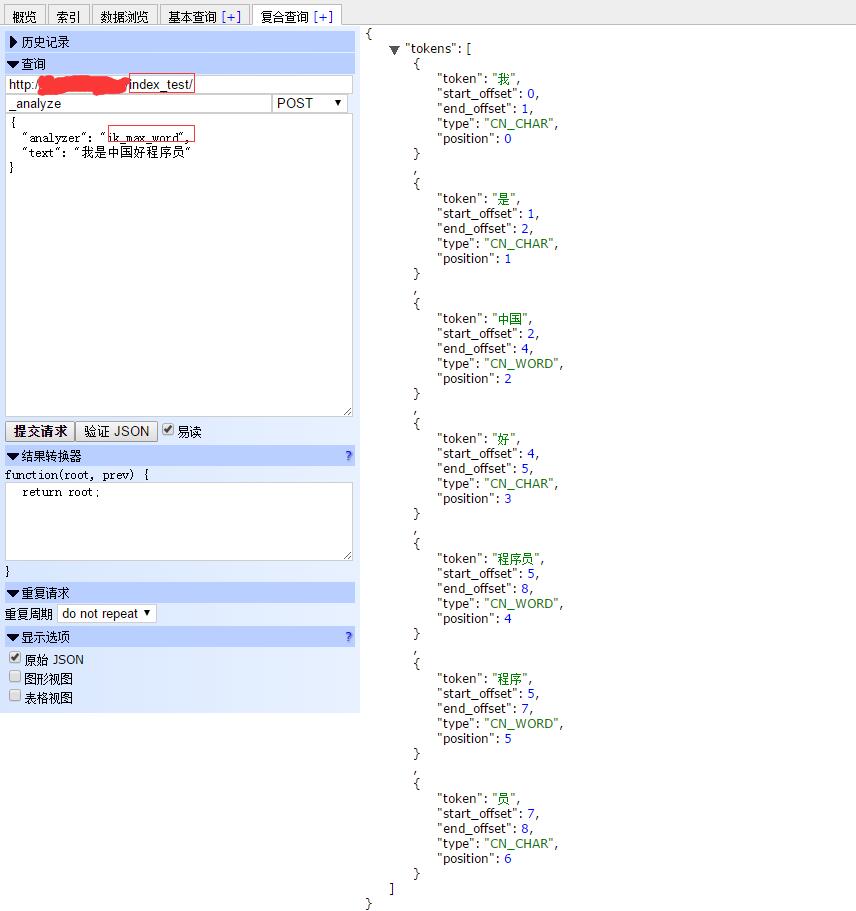
IK分词测试
新建一个索引index_test
curl -XPUT http://127.0.0.1:9200/index_test
测试一下分词效果:
在head中测试,如下图: